DIY Scrunchies
Hey guys!
The fabric was really thick, so make sure your needle is thick and I suggest using a thimble so you don't hurt your finger.
Step 6:
Welcome back! Today I want to show y'all how I make my scrunchies. I started making these when I started learning how to sew with a sewing machine. My grandma actually gave me her sewing machine and so I started to learn how to use it. I always thought a sewing machine was complicated and hard to work with but after I got the hang of it I enjoyed it so much and it's quite easy to sew with it.
I've done many things with the sewing machine like, make scrunchies, sew holes closed in my family's clothes, made a headband and more. But today I want to show y'all how to make a scrunchie. Also, if you don't have a sewing machine or don't know how to use one, don't worry, you can make this with a needle and thread as well <3
DIY Scrunchies!
what you need:
- elastic
- fabric
- scissors
- ruler
- pen (to mark where to cut)
- sewing machine or thick needle + thread
Method:
First, let's start of with measuring our fabric and elastic. The measurements I used ~
Fabric:
width - 10 cm (4 inches)
length - 41 cm (16 inches)
Elastic:
18 cm (7 inches) add 1 cm so you have space to sew
Step 1:
After you have your measurements, fold your fabric in half and sew along the edge. Make sure the "pretty" side is inside, when you sew, and the "ugly" side outside.
If you want, you can put pins along the edge to keep your fabric straight to avoid sewing skew.
Once you finished sewing the edge, take a big safety pin and hook it on one of the sides. Slip the safety into the inside of the fabric and move it through until the safety pin comes out on the other side.
When the safety pin comes out on the other side it should look all scrunched up like the second picture. Now, just pull the safety pin until the fabric is turned inside out and the sewing line is inside. The "pretty" side should now be outside and the "ugly" side inside.
Step 3:
Now, we need to get the elastic inside of the fabric. To do this, take the safety pin and hook it on the elastic. Hold the one side that doesn't have the safety pin on so it doesn't get lost in the fabric. Move the safety pin that's attached to the elastic through the sleeve until it comes out the other side.
Step 4:
Next, we're going to sew both ends of the elastic together. If you're using a sewing machine, you can use a needle and thread to sew them together, which is what I used to do but I prefer using the sewing machine.
Now, you're going to sew the ends of the fabric together to finish the scrunchie. First fold the rough edges before sewing so it doesn't come loose or unravel.
I used a needle and thread instead of my sewing machine because I feel like it would take forever and look a bit messy.
 |
Remember to fold rough edges and sew them together |
Step 6:
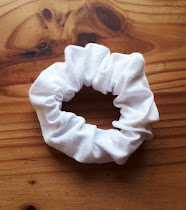
You're finished! Once you've sewn them together, you're done with your scrunchie!
Ta-da! That's it on how to make a scrunchie! If you have any questions, comment down below and I'll be happy to answer them! You can make these scrunchies out of any type of fabric, I make my scrunchies out my dad's old t-shirts, or my old clothes that don't fit me anymore. And you can make a bunch of scrunchies out of just 1 t-shirt.
I also want to say thanks to my readers! Last week, 14th of August, one year ago I typed and published my very first blog post and I just want to thank all of you who has read my blog posts this past year. This blog almost has 1,000 views! And it wouldn't be possible without you guys! You are all amazing <33
Thanks for reading this post and I hope y'all have a wonderful day! Luv y'all! Stay safe!
Bye xx


.png)

Thank you for this hints you gave us by making your own scrunchies
ReplyDeleteBye xx
Congratulations on all your viewings and first birthday as an blogger!!! Anybody missing out on your blog is missing out BIG TIME. Always enjoy reading your stories. Keep it up😉
ReplyDelete