Spongy Red Velvet Cake
Hi!
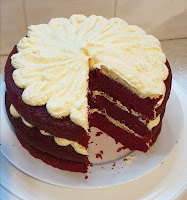
Welcome back to this week's post! Today I want to share a cake recipe we made for my brother's birthday! Last week he turned 18 years old and he told us he wanted a Red Velvet cake, so my mom and I prepared ourselves for a flop.
We're not the best at making cakes like Red Velvet, so we didn't expect too much. We decided to find a recipe from our favorite baker - I Am Baker - and, of course, the cake was a success.
The cake came out soft and spongy with the perfect flavor of Red Velvet. The cake also had a beautiful red color that perfectly combined with the cream cheese frosting.
We made an original cream cheese frosting recipe and discovered some secrets on how to keep it stiff and delicious.
In this blog post, I'll share the recipe and changes we would like to make that'll make it better in our opinion.
IMPORTANT NOTE: My mom and I divided the recipe in half, so the recipe I'm sharing is for one layer.
Let's start!
red velvet cake
ingredients
1/2 cup homemade buttermilk (room temp.) - see notes on how to make buttermilk that's perfect for this recipe
1/2 tsp vanilla extract
1/2 tsp vinegar
1/2 bottle (20 ml) red food coloring
1 cup sugar
1/2 cup oil (we used canola oil)
1 large egg (room temp.)
1 1/4 cup flour
1/8 cup cocoa powder
1 tsp baking powder
method
Make homemade buttermilk 1 - 2 hours before making this recipe (You may use regular buttermilk).
Preheat oven to 180C. Prepare a 9-inch cake pan with parchment paper, lining the bottom and sides of the pan. You may use butter or baking spray to coat the bottom and sides of the pan as well but I find parchment paper works best.
In a measuring cup, add 1/2 cup of buttermilk, vinegar, vanilla extract, and red food coloring and mix well.
In a large bowl, whisk sugar, oil, and eggs by hand until it's smooth and light yellow.
Add flour, cocoa powder, and baking powder to the sugar mixture and mix well.
Now add the buttermilk mixture and mix gently with a whisk. Make sure there aren't any lumps but also be gentle with the batter.
Pour batter into cake pan and bake for about 25 minutes or until toothpick comes out dry. Allow cake to cool for a few minutes before transferring to cooling rack.
The cake must be cool to assemble with icing.
cream cheese frosting
(original recipe)
ingredients
250 g butter (room temp.)
250 g firm cream cheese (right from the fridge)
5 ml vanilla essence
4 cups icing sugar (sifted)
method
Cream butter and cream cheese till fluffy with a hand mixer on HIGH SPEED.
Then add sifted icing sugar and mix on LOW SPEED otherwise, the icing sugar will go everywhere.
Add vanilla extract and start mixing at high speed again, until frosting is stiff but fluffy.
- NOTES -
red velvet cake
Homemade buttermilk (3 layers of cake)
1 1/2 cup of milk
3 tbsp vinegar
Mix well and cover with cling wrap for 1 - 2 hours.
This homemade buttermilk works best with this recipe!
The reason my mom and I divided the recipe in half is because we were planning to make two layers separately. Our oven can't take multiple pans at once and we didn't want one half of the batter to stand while baking the other half so we thought, make half of the batter and bake it, and make the other half of the batter and bake it. But when the first layer was done baking, it looked "flat" so we decided to make three. Turns out we used a 9-inch pan and I Am Baker used an 8-inch pan which made ours look "flat" but they were the perfect size after all.
We would also like to change 1 cup of sugar to 3/4 cup of sugar because the layers would sometimes be too sweet, especially with the cream cheese frosting.
We used a 40 ml bottle of red food coloring for two layers so there is 20 ml red food coloring in each layer.
My mom and I baked the cake Wednesday and made the frosting Thursday and the cake became more moist and spongy overnight, so I definitely recommend baking the cake a day before.
frosting
The frosting is our original recipe and tastes amazing. I'll be honest, the frosting did flop a bit for some reason but it wasn't runny and it was delicious. I think we over mixed the frosting which is why it split after we transferred it into a piping bag.
My mom and I are going to cream the butter first, chill in the fridge then make the rest of the frosting next time we try it.
The secret to keeping the frosting stiff is mixing it at high speed with a hand mixer. My mom and I watched a YouTube video on this and it turns out to be the perfect method to keep it at a good consistency.
The cream cheese has to come straight from the fridge and butter has to be at room temperature for it to turn out stiff but we want to see what happens if we chill the butter a bit as well next time.
Overall, the cake was fantastic! The color was perfect and this cake still mesmerizes me on how it gets its flavor. Definitely a winner for any occasion and it tastes amazing!
This is my favorite Red Velvet cake recipe we've ever made, mostly because it's so simple with many familiar ingredients that I'm sure everybody has in their home. It's also easy to make and so spongy and soft!
✰ Pinterest account! - TeenagerChef
Thank you for reading this recipe (I know I haven't posted one in a while) and comment down below how yours turned out! I'm super curious! Have a great week! Stay safe!
Bye xx


.png)

This red velvet cake look so delicious that I'm sure this is my next cake to try. Thanks for sharing this recipe and the tips
ReplyDeleteBye
Pleasure! Thanks for reading the post! :)
Delete